Power & Light, Part 3: The Light Place At The Light Time
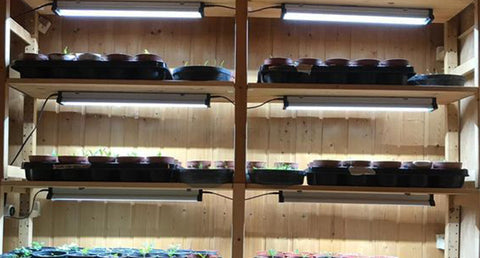
Want to grow a meal in your Garden? Craving some vine-ripe tomatoes in January or fresh crisp chile peppers on demand? An indoor vegetable garden takes more work than ornamental houseplants or kitchen herbs, but the rewards of this challenging project include not only garden-fresh produce but the satisfaction of getting the most out of your aquaponic system. In this entry in our Power Gardening series, we continue our exploration of light and lighting from Power & Light, Part 1 and Part 2. When we left off, we’d discussed properties of light, intensity, power, and choosing enough light for your needs..
It’s Also About How You Use It
Power’s no good if it’s not where you need it. Positioning your lighting for optimum coverage is essential for making all that light energy available to your plants. You’ll need to cover your growing plants’ canopy as evenly as you can, and cover as little else as possible!

Height: Even cool LEDs can burn your plants’ leaves with too much light or heat, but they emit so much less heat than older styles of lighting that they can can be much closer. Small 1-3W LEDs are commonly placed 6” above the tops of growing plants. 5W or larger diodes are less efficient and usually placed 8-12” above. (Other bulb styles like halogen and HID produce so much heat they must be a couple feet away from plants, and often warm the growing area substantially.) Lights placed higher will need to be correspondingly more powerful to deliver the same PAR to the canopy.
Form Factor: Most LED grow lights are sold in bars or panels, but there are plenty of single point spots. If you’re growing in a square area, a few parallel bar-type or one square panel makes sense. Spots can be useful for single plants, or for addressing dark spots in irregular canopies. Match the shape of light emission to the shape of your growing area!
Ventilation: Your plants need to breathe, but ventilation is also important for removing waste heat from powerful lights. One modest LED won’t heat your home significantly, but if you have a sizable indoor garden in a closed room, you may be using hundreds or even thousands of watts of power, and powerful lights get hot. To protect your plants and your lights, make sure there’s fresh air to keep things cool.
Reflection: Light diffracts through air, and even dark surfaces reflect somewhat. Light that doesn’t reach into your plants’ leaves will strike somewhere and go to waste. You can recapture that light by making the surfaces around your plants as light-colored and reflective as possible, and it makes a bigger difference than you might think. More than just recapturing, reflectors can also be used to direct light into the sides or lower canopy of your plants without adding extra lamps, lighting up more leaves and allowing more photosynthesis ..
Many powerful grow lights come with a reflector unit that sits over the lamp like a hood and focuses and directs the light. Professional hydroponic grow rooms are often clean white on as many surfaces as possible; small growers may use reflective mylar “tents” to contain all the light in a small area. On a shoestring, people have even used mylar blankets or sheets of foil on the walls or hung around a growing area.
At home, the extra light coming off your plants may not be wasted; it can make a room cheerfully bright and pleasant to be in, especially in gloomy winter months. Just be aware that all the extra brightness coming off your system isn’t being used for plant growth!
Troubleshooting
The most common lighting-related problems are easy to spot. If the tops of your plants nearest the lamps are wilting, or turning yellow and browning at the tips, the light may be too intense, or the heat emitted by the lamps is too much and not being removed quickly enough. Light-burned plants may give the appearance of being sick, because damaged leaves are more susceptible to pests and diseases and may show spots or discoloration characteristic of fungal or bacterial infection. Remove any leaves that look sick or seriously damaged. Plants receiving a lot of light may darken, and growth may become shorter and more compact.
With insufficient light, plants will “reach” to try to escape shade. New growth will be pale and etiolated (or “leggy”), with thin, elongated stems and leaves. Coloration can be inconsistent, with patches of slightly darker green where the plant is receiving the most light. Growth slows dramatically in insufficient light, as does nutrient uptake and use, and the plant may drop leaves. Insufficient light can look like some major nutrient deficiencies, like nitrogen, but coloration tends toward pale green rather than the yellow of chlorosis.
Subtler problems with light spectrum and timing can occur, especially in high-production flowering and fruiting crops. Too much blue light may reduce flowering, while too much red light early on may induce premature flowering. Long days usually encourage vegetative growth, and some crops are induced to flower by reduced daylight hours. If you’re getting serious about lighting, it pays to do some research on the specific light timing and spectral needs of your crops!
Wrap Up
Lighting in horticulture is a complex topic, reflecting both the incredible breadth of ecological diversity of plants in their evolved growth habits, and the depth of technical knowledge in electrical engineering and physics that goes into the creation of specialty artificial lights. The average home grower does not need to venture far into this territory; this quick overview should help avoid the most common problems, and point you in the direction of more information if you should need it.
If you’re thinking about getting serious with your grow lights, do your research! Learning about the terminology, reading reviews of lighting manufacturers, and understanding the life cycle and particular needs of your crops will help you make the right choices. If you’re a budding commercial grower, this information will be essential to help you accurately calculate energy and equipment costs. And if you’re a home hobby gardener, a modest investment of time and money up front can set you up for harvest after harvest of the best vegetables you’ve ever grown.

